From Personal to Company-Owned: Migrating All Your SaaS Accounts to a Shared 2FA Number
Switching your SaaS accounts from personal phone numbers to a shared company-owned 2FA number is a straightforward way to improve security and streamline access for your team. Relying on personal devices for two-factor authentication (2FA) can lead to lockouts when employees are unavailable or leave the company. A shared 2FA system ensures that critical accounts like AWS, Stripe, and Google Workspace remain accessible without disruptions.
Here’s how to get started:
- Catalog all accounts: List every platform using 2FA, noting the method and sensitivity of each.
- Prioritize critical services: Focus on accounts tied to payments, infrastructure, or compliance requirements.
- Set up a shared number: Use a real-SIM service like JoltSMS for reliable 2FA compatibility across platforms.
- Update account settings: Replace personal numbers with the shared number and test for functionality.
- Secure team access: Use tools like Slack or encrypted password managers to share codes safely.

5-Step Process for Migrating SaaS Accounts to Shared 2FA Number
Step 1: List All Your SaaS Accounts and Their 2FA Methods
Before diving into any migration process, take time to catalog all your accounts. Many businesses are surprised to find they have dozens of accounts tied to 2FA, spanning payment systems, cloud services, marketing platforms, and communication tools.
Start by exporting data from your password manager and cross-checking it with financial records and project management tools. Review internal documentation stored in platforms like Asana, where onboarding materials often outline essential services. You can also search through Slack messages or emails using terms like "verification code", "2FA setup", or "QR code" to uncover any overlooked accounts.
For each account, make a note of three key details: the service name, the type of 2FA being used, and the sensitivity of the data it protects. This information will help you evaluate which accounts need immediate attention. As Laura Bell and Erica Anderson explain in Security for Everyone:
"Every copy of business data we have, the more security risk we introduce... Access to data is the same as duplicate copies of data - the more ways you can access the data, the more security risk you have." [2]
By creating this detailed inventory, you’ll have a clear roadmap for prioritizing and transitioning your most critical accounts.
How to Identify Your Most Important Accounts
Not every account requires the same level of urgency during migration. Focus on the ones that could cause major disruptions if access were lost. These often include payment platforms like Stripe, banking tools, cloud infrastructure providers such as AWS, and productivity tools like Google Workspace or Microsoft 365.
Pay special attention to accounts that handle sensitive customer or internal data, especially if your organization must adhere to compliance standards like SOC2, GDPR, or HIPAA. Shared accounts - like those used for social media management or DevOps tools - should also be high on your list since multiple team members rely on them for verification codes.
Once you’ve identified your high-priority accounts, confirm that each platform allows number changes without causing service interruptions.
Check Which Platforms Allow Number Changes
Before proceeding with a specific account migration, confirm that the service lets you update your 2FA number without requiring a full account reset. While most major platforms support number changes, some older systems or niche services might make you disable 2FA entirely and set it up again with the new number.
Real-SIM numbers are a reliable fallback when other methods fail. JoltSMS, for example, uses real-SIM technology instead of VoIP, making it compatible with over 1,000 platforms for SMS verification. This ensures that even services that typically block virtual numbers - like WhatsApp, many banking apps, and AWS - will accept verification codes. If the service offers TOTP (Time-Based One-Time Password) as an option, be sure to securely store the secret key for added flexibility.
Step 2: Rank Your Accounts and Get a Shared 2FA Number
Once you’ve listed all your accounts, the next step is to rank them based on their importance to your business. Start by focusing on accounts that handle sensitive customer data, financial transactions, or essential infrastructure - think AWS, Stripe, or your online banking platform. These are the accounts you absolutely cannot afford to lose access to, as doing so could disrupt operations or even result in compliance issues.
Next, identify accounts that are accessed frequently by your team or those tied to high-turnover roles. Examples include company social media profiles, customer service tools, or platforms used for DevOps. If your business is subject to regulations like SOC2, GDPR, HIPAA, or PCI DSS, make sure to flag these accounts for their stricter access and logging requirements [1]. By ranking your accounts in this way, you can focus on securing the most critical ones first, reducing risk efficiently.
Once you’ve prioritized your accounts, the next move is to set up two-factor authentication (2FA) using a shared, secure number.
How to Set Up a JoltSMS Number

To get started, head over to JoltSMS and register for a real-SIM number. You can select a U.S.-based number and have it ready in just minutes. Through the JoltSMS dashboard, all incoming SMS codes are displayed in real time. The service costs $50/month, offering unlimited inbound SMS, instant notifications, and webhook integration for easy team access.
With JoltSMS, you can route verification codes directly to platforms like Slack or Discord via webhooks. This eliminates the hassle of team members forwarding messages or taking screenshots of their phones. The platform also includes a REST API for automation and an audit trail that tracks who accessed which code and when. These features are especially important for maintaining security and meeting compliance requirements [1][3]. This real-SIM setup provides a seamless solution to secure team-wide access.
VoIP vs Real-SIM Numbers for 2FA
Many businesses rely on VoIP services like Google Voice or OpenPhone for 2FA, but these often fall short. High-security platforms like banks, AWS, and WhatsApp frequently block VoIP numbers for verification to prevent fraud [4]. While VoIP services are great for business calls, they’re often flagged as "virtual" or "landline" numbers, making them unreliable for receiving verification codes.
Here’s a quick comparison of real-SIM numbers like JoltSMS versus VoIP services:
| Feature | JoltSMS (Real-SIM) | VoIP (Google Voice, OpenPhone) |
|---|---|---|
| Verification Acceptance | High (treated like a mobile phone) | Low (frequently blocked by banks and major platforms) |
| Team Access | Built-in (webhooks, Slack/Discord integration) | Limited (requires sharing app logins) |
| Audit Trail | Yes (via API/logs) | Minimal or none |
| Pricing | $50/month (flat rate) | $0–$30/user/month |
Real-SIM numbers operate through physical cellular networks, making them indistinguishable from personal mobile numbers. This allows them to bypass the filters that block VoIP numbers, ensuring you can reliably receive critical verification codes. If you’ve been running into errors like “This number cannot be used for verification” with a VoIP service, switching to a real-SIM number like JoltSMS can solve the issue immediately.
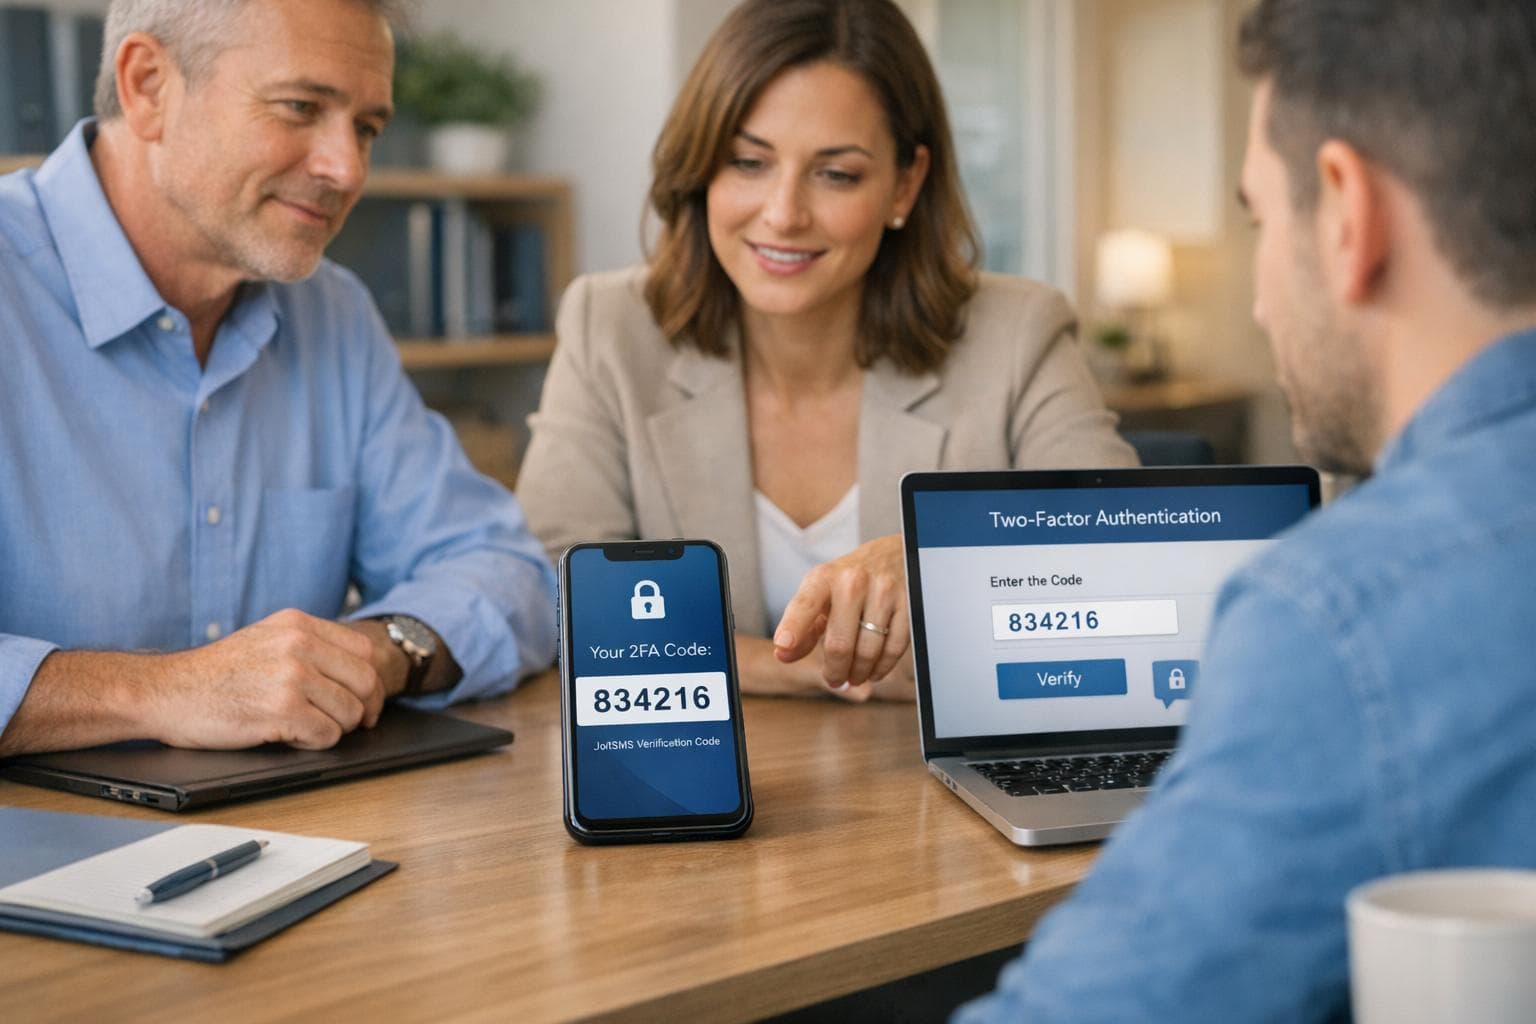
Step 3: Switch Your 2FA Numbers to the Shared Number
Now that your shared JoltSMS number is ready, it’s time to update your 2FA settings. Plan this migration during quieter times to minimize any interruptions. Begin with lower-priority accounts - this gives you a chance to get comfortable with the process before handling critical accounts like AWS or Stripe.
How to Update 2FA Settings on Each Platform
Navigate to the security settings of each account, remove the old phone number, and replace it with your new JoltSMS number. When prompted, the platform will send a verification code to your JoltSMS number. Retrieve the code from your JoltSMS dashboard to complete the update. Once done, log out and log back in to ensure the changes were successful.
Avoid sharing QR codes or secret keys through email or Slack. For platforms using TOTP (such as Google Authenticator), save the text version of the secret key during setup. Store it securely in an encrypted business password manager like 1Password or Bitwarden. This way, you can easily onboard new team members later without needing to reset 2FA for everyone.
Set Up Backup Access Methods
Once your 2FA settings are updated, establish backup recovery options. Use a company recovery email and download any backup codes offered by the platform. Save these securely in your encrypted password manager.
For sensitive accounts, like banking or payment systems, consider keeping your personal number as a temporary secondary backup. Once you’ve confirmed the JoltSMS number is functioning reliably across all accounts, you can remove your personal number. With around 81% of data breaches involving weak or stolen credentials [1], taking these steps seriously helps safeguard your accounts and reinforces your overall security.
sbb-itb-070b8f8
Step 4: Tell Your Team and Set Up Code Notifications
With your accounts updated and backup methods in place, the next step is ensuring your team has secure access to the necessary codes. After updating 2FA numbers, make sure only authorized team members can access codes, and that there’s a clear, auditable trail.
How to Share the New Number Safely
Avoid sharing screenshots in Slack or Discord. This creates permanent, untraceable records that can easily leak or violate compliance requirements like SOC2 or GDPR. Instead, assign access based on roles. For instance, managers might need access to payment platform codes, while the entire development team may require AWS or GitHub verification codes.
Store the JoltSMS number and TOTP keys in a secure, encrypted team vault like 1Password or Bitwarden. Use shared vaults with role-based access to ensure only the right people can view sensitive codes. It’s also important to emphasize in your team guidelines that the shared 2FA number is strictly for work accounts only - personal accounts should remain separate to protect both privacy and security.
Make the shared 2FA setup part of your onboarding and offboarding processes. Use a task-tracking tool like Asana to keep a clear record of which accounts use the shared number, who has access, and how to log in. This way, when someone leaves the company, you can immediately revoke their access to the JoltSMS dashboard and password manager vault without needing to reset 2FA for everyone else. This approach ensures smooth transitions within your team.
Integrate JoltSMS with Your Team Channels
JoltSMS offers webhook integrations that can automatically send incoming SMS codes to your team’s Slack or Discord channels. This setup provides instant and secure access to codes without sharing login details. Create a dedicated private channel (e.g., #2fa-codes or #verification-codes) and restrict access to only those who need it.
To set it up, enter your Slack or Discord webhook URL in the JoltSMS dashboard. Incoming codes will appear instantly, complete with sender information and a timestamp. This creates a searchable, auditable record while keeping codes accessible to the right team members. It’s a simple way to streamline access while maintaining security and accountability.
Step 5: Test Everything and Monitor Long-Term Performance
Once the migration is complete, it’s time to test everything thoroughly. Start by checking each critical account to ensure everything is functioning as expected. Perform real-world login scenarios for key SaaS accounts - such as Stripe, AWS, or your banking platform. Trigger a 2FA code and verify that it appears in your JoltSMS dashboard or connected Slack channel without delay. This hands-on testing will help you catch any accounts that were overlooked or misconfigured during the migration process.
Test Code Delivery and Team Access
Focus on your most important accounts first. Log out, then log back in to generate a 2FA code. Confirm that the code arrives within seconds in your JoltSMS dashboard and ensure team members can access it based on their assigned roles (Owner, Manager, or Viewer). Use the unread counts feature to quickly spot new codes during testing [5].
To stay organized, assign custom labels and notes to each shared number in JoltSMS. This will help you track which SaaS accounts are tied to specific numbers [5]. If you encounter delivery issues, take a look at the webhook logs to identify delivery events and pinpoint potential problems [6]. Most issues are usually related to account settings rather than actual delivery failures.
Once you’ve confirmed that everything works through manual testing, it’s time to move toward automation.
Use the JoltSMS API for Monitoring and Automation
To maintain reliability over time, integrate the JoltSMS REST API into your internal monitoring systems. Set up POST-webhooks to automatically track 2FA codes [5]. When configuring webhooks, make sure to validate requests using the HMAC-SHA256 secret [5].
Keep an eye on key metrics like OTP request volume and failed login attempts. These can help you spot unusual patterns early. For example, set up automated alerts to flag excessive verification requests or suspicious bursts of activity, which could indicate potential security threats [7]. The API also allows you to monitor delivery latency across platforms, so you can identify accounts where code delivery is consistently slower. By staying proactive, you can ensure your 2FA system remains dependable.
Conclusion
Switching to a company-owned 2FA number is a smart move for securing critical accounts and ensuring smooth business operations. Relying on individual devices for 2FA can lead to major headaches - like lockouts - when an employee leaves. By adopting a shared 2FA number, you eliminate this risk, keeping essential tools like Stripe, AWS, and banking platforms accessible no matter what changes occur within your team. It’s a way to avoid operational chaos when key team members are unavailable.
To make the transition seamless, follow these five steps: inventory, prioritize, switch, communicate, and test. This process keeps disruptions to a minimum and ensures your team is ready to adopt a system that simplifies account management and strengthens security.
JoltSMS offers a practical solution with carrier-grade physical SIM cards that bypass VoIP restrictions. Their service boasts a 99.9% acceptance rate across over 1,000 platforms for $50/month, complete with team-friendly features like Slack integration.
Centralized 2FA management not only closes security gaps but also supports compliance needs. Consider this: 81% of breaches stem from weak or stolen credentials [1]. Poorly managed 2FA systems only add to the problem. A shared system, on the other hand, provides a clear audit trail for frameworks like SOC2 or GDPR, tracking exactly who accessed which codes and when. This level of accountability is impossible when codes are scattered across personal devices or shared informally via screenshots. By consolidating your 2FA process, you improve security, enhance compliance, and make operations more resilient.
Once your migration is fully tested, your system will grow with your team, maintain strong security measures, and align with the centralized approach outlined in this guide. Your business accounts will remain accessible, well-protected, and properly documented - putting an end to the headaches of managing individual 2FA methods.
FAQs
Why is switching to a shared 2FA number better for security?
Switching to a shared 2FA number can strengthen security by consolidating all verification codes into a single, dedicated number tied to a real SIM card. This approach eliminates the need to share sensitive details through risky methods like screenshots and helps protect personal phone numbers from unnecessary exposure.
Beyond security, a shared 2FA number offers practical benefits. It establishes an audit trail, making it simpler to track access and verify compliance. By reducing the likelihood of credential theft and streamlining team coordination, this method provides a safer and more organized way to handle account security.
How do I set up a JoltSMS number for two-factor authentication (2FA)?
To start using a JoltSMS number for receiving two-factor authentication (2FA) codes, the first step is to get a JoltSMS number through their platform. Once you’ve secured the number, update your SaaS account settings by replacing your personal or previous business phone number with your new JoltSMS number. After making the changes, test each account by triggering a 2FA code to ensure everything works correctly.
If you’re managing multiple accounts, it’s a good idea to create a list of your logins, focus on updating critical accounts first, and inform your team about the changes. Additionally, testing recovery options after the migration can help ensure the transition goes smoothly without any unexpected issues.
Why don’t VoIP numbers work for SMS verification?
VoIP numbers operate virtually and don’t rely on a physical SIM card, which means they lack the authentication provided by traditional carriers. Because of this, many platforms block VoIP numbers to reduce the risk of fraud, making them an unreliable choice for receiving SMS verification codes.
If you’ve run into trouble verifying accounts on services like banks, WhatsApp, or Stripe, it’s likely because these platforms reject VoIP numbers for security purposes. Opting for a real SIM-based number guarantees compatibility and helps avoid these issues.